
Overcoming Fear in the Art Room: Why So Many Students Give Up Before They Begin
In every classroom—especially the art room—there are students who freeze at the first sign of a blank page or canvas. They don’t know where to begin, and that fear of starting becomes overwhelming.
“What if I mess up?”
“What if everyone else is better than me?”
“What if I’m just not good at this?”
Fear of failure, embarrassment, and peer pressure can prevent students from even attempting a new art technique. But what if we could reduce that fear and replace it with curiosity, confidence, and joy?
This is where scaffolding in art education becomes a game-changer. When educators introduce new skills in small, supportive steps, students feel safe enough to try, fail, learn, and grow. In this post, we’ll explore how scaffolding helps students build foundational art skills, and how you can implement it effectively—whether you’re teaching sketching, watercolor, or acrylic painting.
What Is Scaffolding in Art Education?
In education, scaffolding refers to a teaching strategy where complex tasks are broken into smaller, more manageable steps. Each step is supported with guidance, resources, and modeling until students gain the confidence and ability to work independently.
In the art classroom, scaffolding provides structure for skill development, helping students build technical ability without the intimidation of high-stakes final projects from the start.
Key benefits of scaffolding in the art room:
- Reduces student anxiety and fear of failure
- Supports skill-building through guided practice
- Encourages artistic exploration without judgment
- Builds student confidence and creative independence
Pencil Sketching – Start with the Basics
When introducing students to sketching with pencils, we don’t dive into full compositions right away. We begin with a simple and effective exercise: the 5-grid value scale.
Students shade five squares, each representing a different value from lightest (1) to darkest (5). Because students are already familiar with number systems, this helps them visually connect numeric values to shading intensity.
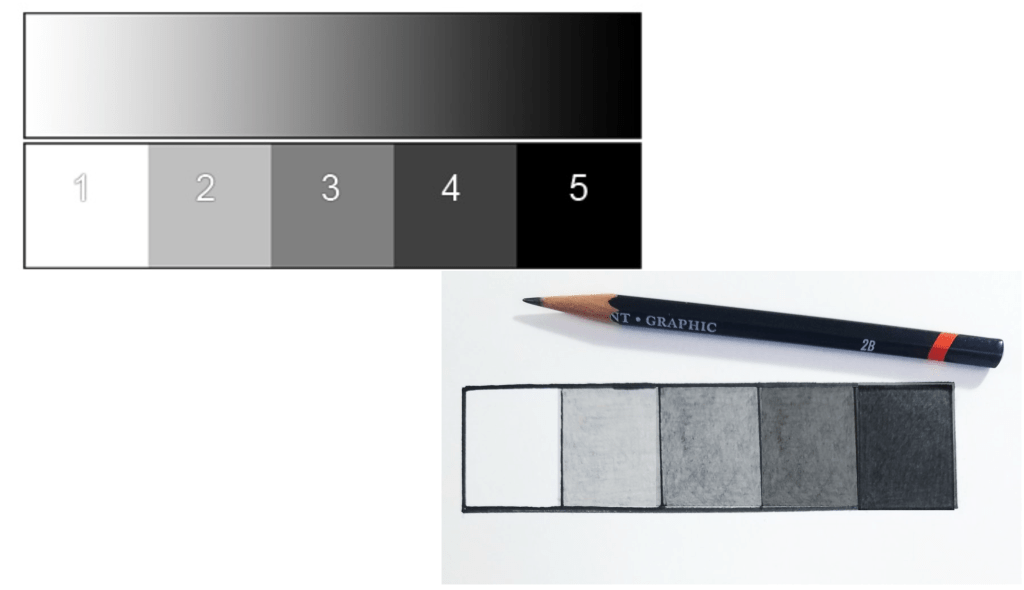
This activity teaches:
- Graphite control and pencil pressure
- How to identify and apply tonal values
- The role of contrast in creating form
It also gives students a visual reference they can return to throughout their project, empowering them to self-assess their work with clarity.
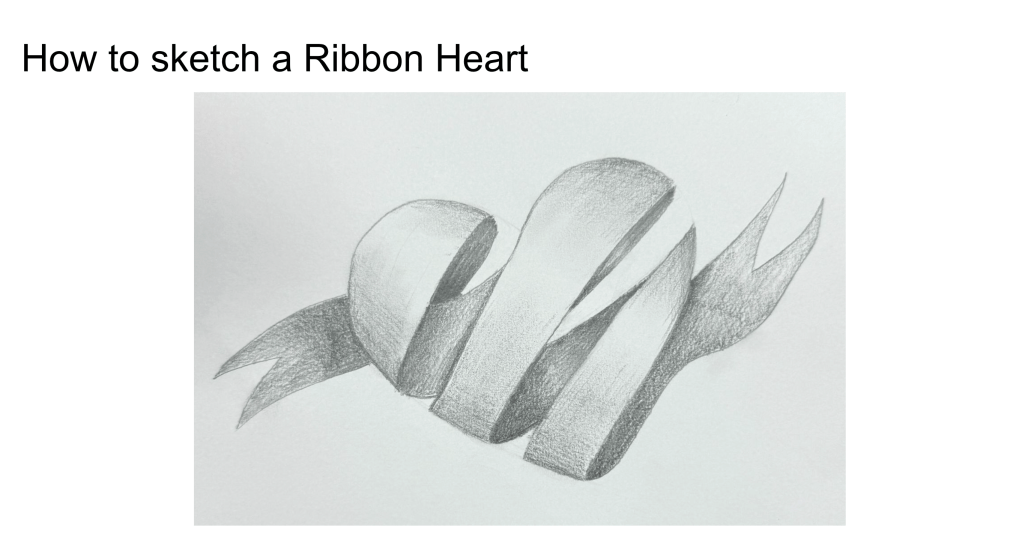
Build Complexity – Shading the Ribbon Heart
Once students grasp value, they apply their learning to a structured practice: the ribbon heart shading activity. This project introduces more complexity while still offering a clear framework.
We begin with a teacher demonstration, modeling how to apply:
- Values 3, 4, 5 on the bottom part of the ribbon
- Values 1, 2, and a touch of 3 on the top to create contrast
This exercise introduces the concept of 3D form and helps students understand how value creates depth. Importantly, we also address the common pitfall of over-smudging.
✅ Pro Tip: I teach my students that a strong pencil drawing should be 80% intentional shading and only 20% blending. Over-smudging often leads to flat, cloudy results, covered in fingerprints. Controlled shading, on the other hand, preserves detail and enhances realism.
Scaffolding Watercolor and Acrylic Painting Techniques
Just as we scaffold pencil sketching, we approach painting with watercolor and acrylic in a similarly structured way.
Before students begin any painting project, they first create a technique swatch sheet using:
- Dry-on-dry (dry brush on dry surface)
- Wet-on-wet (wet brush on wet surface)
- Dry-on-wet (dry brush on wet surface)
- Wet-on-dry (wet brush on dry surface)
These swatches help students explore the behavior of each medium, make discoveries, and build confidence before applying paint to a final composition.
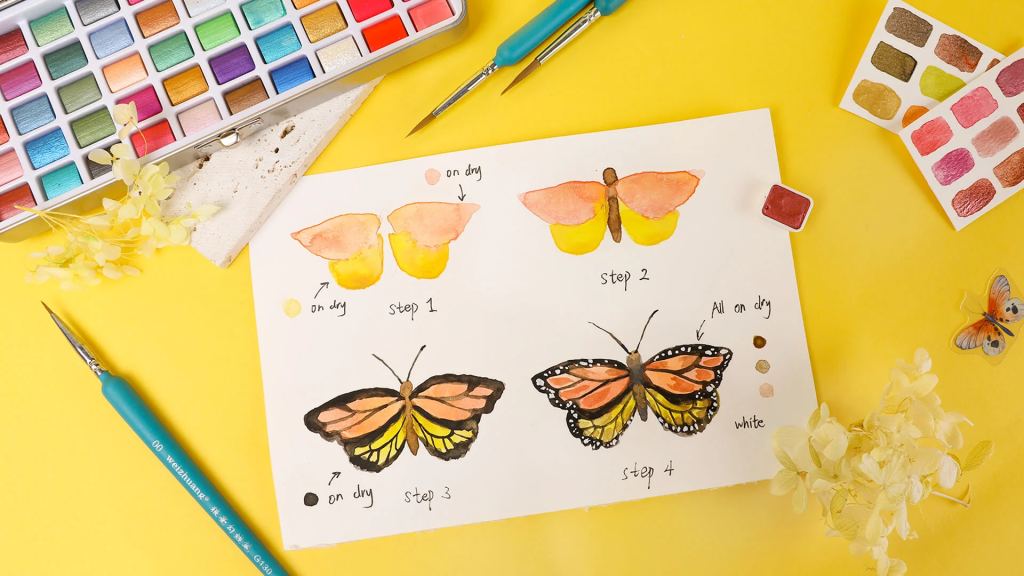
Grabie Art. How to Paint a Lifelike Watercolor Butterfly. Retrieved from https://grabieart.com/blogs/ideas-tutorials/how-to-paint-lifelike-water-color-butterfly
Guided Practice Through Structured Paintings
After students experiment with painting techniques, they complete a guided painting project, often based on a simplified master study or a tutorial-style demonstration. While the outcomes may look similar at first glance, these projects are critical for:
- Reducing creative pressure by offering structure
- Giving students a model to follow and learn from
- Helping them understand pacing, layering, and brush control
Though some may call these “cookie cutter” projects, they serve an essential purpose: building familiarity with tools and materials in a low-stress environment. Once students internalize the process, they’re much more prepared to explore their own ideas and take creative risks.
Why These Small Steps Matter?
Each scaffolded task—from the value scale to guided painting—is deceptively simple. But together, they lay the groundwork for artistic mastery. More importantly, they help students shift their internal narrative from “I can’t do this” to “I’m learning how to do this.”
In many ways, scaffolding helps students build not just skill—but confidence. They begin to see mistakes not as failures, but as part of the process. And that mindset is essential to developing as an artist.
Final Thoughts: Scaffolding Builds More Than Just Art Skills
Art education is about more than teaching technique. It’s about nurturing resilience, encouraging experimentation, and helping students trust themselves.
By using scaffolding strategies in your art classroom, you create an environment where students are supported step-by-step. You reduce fear and increase engagement. And you equip them not only to create—but to persevere.
So the next time your students feel stuck or unsure where to begin, show them the first step. Guide them through the process. And watch as they build the skills—and the confidence—to create something amazing.


Leave a comment